How to make Bike accelerator free.
How to make Bike accelerator free.
My name is Isar Ahmad Siddiqui and today's topic is that the accelerator wire of the bike gets jammed. I mean the accelerator gets jammed and your hands start hurting while running the bike. In a crowded area, it directly affects your brain, to get rid of this mental tension, do this small act of accelerator.
So how will the accelerator be free. I am going to tell you how to read the entire article and then take advantage of it with the help of a screwdriver and a little turpentine oil, you can do this work without any expense.
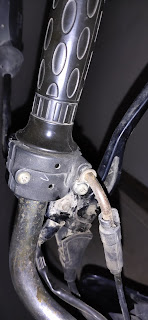
First take a screwdriver, also called a plus screwdriver, and unscrew the two screws under the handle of the accelerator. And take out the aluminum cover bracket, then take it out of the grip of the accelerator wire handle and let the top area in which the mirror setting is hanging also hang down then the bottom part of the accelerator wire which fits in the carburetor. Open it.
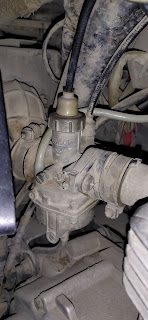
That means there is a churidar cap on top of the carburetor, open it on the left side and move it upwards, below that the accelerator wire knob will be stuck in the piston of the carburetor. You take out the wire including the piston, then after taking it out, the piston and churidar. There is a spring in the middle of the cap, press the spring upwards with the help of the thumb and fingers and the wire of the accelerator that the car Slightly slice the wire that is stuck in the piston of the booster, as soon as you slant, take out the area of its knob from the piston and keep the piston separate with its needle.
And then take out the spring which is a thicker spring below the cap of the carburetor in the middle of the clutch wire. Then the cap of the carburetor is the setting in the cable with the wire of the accelerator, pull it out also and then the handle of the accelerator. Come to the side and grab the accelerator cable from the top and pull it comfortably so that it does not get stuck and then separate the accelerator cable from your bike.
Now how to clean the accelerator wire
Before cleaning the accelerator wire, make surety check that the knob of the accelerator wire is not broken, its single single star means that only the part on either side of the knob where the knob is mounted, look near those knob and See if any wire is cracked or broken from any side, if it is not broken, then you can hold the wire of the accelerator of the cable with your hand. And by checking it upside down, there is no wire jam inside it. If there is a jam, then take a little bit of petrol or kerosene oil or turpentine oil and then clean the wire, besides rotating the accelerator handle. See the inside of the handle, that is, the whole cover is mounted above the handle, which has an accelerator wire inside it, rotate the cover to see if it is running free or not. If it is, then wash it by adding turpentine oil as the dirt accumulates inside and the handle will be free after the scum has cleared and now between your thumb and first finger to clean the accelerator wire. Keep and hold the last end of the cable, ie the cable wire where it is moving and put a little bit of turpentine oil in your hand, put 2 gm 3 gm 2 ml 3 ml and then the clutch wire Up and down, up and down, keep doing this process again and again, even the oil starts going between the cable and the wire and from this side to the other end of this cable wire from this end to the other end of the cable wire. Till then you keep cleaning it, that is, keep the cable wire up and down, the result of which is that the turbine oil will start coming out from the other end as the internal dirt gets cleaned and then you You will see that the wire inside the cable is completely free and when you are satisfied that the wire is completely free, then you should stop the cleaning process and fit the cable wire back in the same way. Insert the cable wire from the gap between the top frame of the head light and bring it from the bottom of the petrol tank to the carburetor and fit the carburetor in the same way. Invite as was fit before you began doubt that would be wrong somewhere before opening you take him one, two, photo.
And then pick up the piston and needle inside the carburetor, set the accelerator cable wire knob to the piston grips and insert the spring before the spring after the fit. Insert the inside of the carburetor along with it. Take care that the piston has two types of grips on two sides. One side has a fully cut grip. Usri side is half cutting a flue to keep the plane of cutting a flue carburetor. And keep the half-cut grip on the other side.
Then rotate the accelerator to check whether the piston is seated properly or not. If the accelerator is not working at all and the half is not working then you take out the piston again and then Take surety on which side of the piston the group will sit, then by sitting on the same side and then rotating the accelerator, check whether the full is working or not if it is working properly. The accelerator has been fixed and is now free, now you run it, now there is no problem of any kind. So friends, how did you like this article, then like it, then share it, then see you in the next article.
 |
| How to make Bike accelerator free. |
मेरा नाम इसरार अहमद सिद्दीकी है और आज का टॉपिक है कि बाइक का एक्सीलेटर वायर जाम हो जाए मेरा मतलब है एक्सीलेटर जाम हो जाए और बाइक रन करते वक्त आपके हाथों में दर्द होने लगे एक्सीलेटर जाम होने की वजह से तो बहुत खराब लगता है और खासतौर से भीड़भाड़ वाले इलाके में तो सीधा इसका असर आपके दिमाग पर पड़ता है इसी दिमागी टेंशन से मुक्ति पाने के लिए यह छोटा सा कारनामा एक्सीलेटर का ज़रूर सही करलें।
तो एक्सीलेटर कैसे फ्री करेंगे। इसका तरीका बताने वाला हूं पूरे आर्टिकल को आप पढ़ें और फिर इसका लाभ उठाएं एक स्क्रुड्राइवर की मदद और थोड़ा सा तारपीन आयल से यह काम आप कर सकते हैं बगैर किसी खर्चे के ।
सबसे पहले एक स्क्रुड्राइवर लें जिसे प्लस स्क्रुड्राइवर भी कहा जाता है और एक्सीलेटर के हैंडल के नीचे दो स्क्रू हैं उन्हें खोल दें । और एलमुनियम की कवर नुमा ब्रैकेट को बाहर निकालें फिर एक्सीलेटर की वायर हैंडल के ग्रिप में से बाहर निकालें और ऊपर का एरिया जिस में मिरर सेटिंग रहता है उसको भी नीचे लटकने दें फिर एक्सीलेटर वायर का नीचे का portion जो कार्बोरेटर में फिट होता है वहां से खोल लें।
 |
| How to make Bike accelerator free. |
मतलब की कार्बोरेटर के ऊपर चूड़ीदार कैप होता है उसके बाईं तरफ खोलने और उसे ऊपर की तरफ मूव करें उसके नीचे एक्सीलेटर की वायर की घुंडी कार्बोरेटर के पिस्टन में फंसी हुई मिलेगी आप उस पिस्टन समेत वायर को बाहर निकाले फिर बाहर निकालने के बाद पिस्टन और चूड़ीदार कैप के बीच में एक स्प्रिंग होता है उस स्प्रिंग को अंगूठे और अंगुलियों की मदद से ऊपर की तरफ प्रेस करें और एक्सीलेटर की वायर जो कि कार्बोरेटर के पिस्टन में फंसी हुई है उस वायर को थोड़ा सा तिरछा करें तिरछा करते ही उसकी घुंडी वाला एरिया पिस्टन से बाहर निकाल लें और पिस्टन को उसके सलाई समेत अलग रख दें।
और फिर क्लच वायर के बीच में कार्बोरेटर के कैप से नीचे जो एक मोटा सा स्प्रिंग है उस स्प्रिंग को भी बाहर कर लें फिर कार्बोरेटर का कैप एक्सीलेटर के वायर वाली केबल में सेटिंग है उसको भी खींच कर के बाहर निकालें और फिर एक्सीलेटर के हैंडल की तरफ आएं और एक्सीलेटर की केबल को ऊपर से पकड़ कर खींच ले आराम आराम से खिंचे ताकि कहीं फसने ना पाए और फिर एक्सीलेटर वाली केबल को आप अपने बाइक से अलग कर लें।
अब एक्सीलेटर की वायर की सफाई कैसे करें
एक्सीलेटर वायर की सफाई करने से पहले इस बात की surety ले लें की एक्सीलेटर वायर की घुंडी को चेक करें कहीं उसकी सिंगल सिंगल तारे टूटी तो नहीं है मतलब कि केवल के दोनों तरफ का हिस्सा जिधर घुंडी लगे होते हैं उन घुंडी के पास नजर डालें और देखें कि कोई एक वायर भी एक भी वायर किसी भी तरफ से क्र्कै या टूटी तो नहीं है अगर वह टूटी नहीं है करेक् नहीं है तो फिर केबल के एक्सीलेटर की वायर को आप अपने हाथ से पकड़े और उसको ऊपर नीचे करके चेक करें कि केवल के अंदर वायर जाम तो नहीं है ज़रूर जाम होगी अगर वायर जाम है तो फिर आप थोड़ा सा पेट्रोल या केरोसिन तेल या तारपीन आयल ले ले और फिर वायर की सफाई करें उसके अलावा एक्सीलेटर का हैंडल भी घुमा करके देखें हैंडल के अंदर यानी हैंडल के ऊपर जो पूरी कवर चढ़ी हुई है जिसके अंदर एक्सीलेटर वायर होता है वह कवर उसमें घुमा करके देखें कि फ्री चल रही है या नहीं अगर फ्री नहीं है तो उसे भी तारपीन ऑयल डालकर के धुलाई कर दें क्योंकि अंदर मैल जमा होता है और वह मैल साफ हो जाने के बाद हैंडल फ्री हो जाएगा और अब एक्सीलेटर वायर की सफाई करने के लिए अपने हाथ के अंगूठे और फर्स्ट वाली अंगुली के बीच में रखें और केबल के लास्ट सिरे को यानी केबल वायर जहां मूव कर रही है उस सिरे को पकड़े और हाथ में थोड़ा थोड़ा तारपीन ऑयल डालें 2 ग्राम 3 ग्राम 2 एम एल 3 एम एल डालें और फिर क्लच वायर को ऊपर नीचे ऊपर नीचे ऊपर नीचे बार-बार यह प्रक्रिया करते रहें यहां तक के तेल केबल और वायर के बीच में जाने लगे और इस पार से उस पार यानी इस केबल वायर कि इस छोर से केबल वायर की दूसरी छोर की तरफ जब तक निकल ना जाए तब तक आप इसकी सफाई करते रहें यानी ऊपर नीचे ऊपर नीचे केबल की वायर को करते रहें जिसका नतीजा यह होगा कि अंदर का मैल साफ होते होते होते तारपीन ऑयल दूसरे सिरे से निकलना शुरू हो जाएगा और फिर आप देखेंगे कि केबल के अंदर वायर आपका बिल्कुल फ्री हो चुका है और जब वह आप को तसल्ली हो जाएगी की वायर बिल्कुल फ्री हो चुका है तो आप सफाई के प्रक्रिया को बंद कर दें और वापिस वैसे ही केबल वायर को फिट कर दें यानी हंडल के आगे से जो हेड लाइट की ऊपर के फ्रेम के बीच में जो गेप होता है वहां से केबल वायर को इंसर्ट करें और पेट्रोल टैंक के नीचे से लेते हुए कार्बोरेटर तक लाएं और कार्बोरेटर मैं उसी तरह फिट कर दें जैसा के पहले फिट किया गया था अगर आप को डाउट लगे कि कहीं गलत ही हो जाएगी तो आप उसके एक, दो, फोटो ले लें खोलने से पहले।
और फिर कार्बोरेटर के अंदर जो पिस्टन और सलाई लगती है उसे उठाएं उस पिस्टन में एक्सीलेटर के केबल वायर के घुंडी को पिस्टन के ग्रिप में सेट कर दें और उससे पहले स्प्रिंग को इंसर्ट कर लें फिट करने के बाद में एक्सीलेटर वायर पिस्टन और सलाई समेत स्प्रिंग समेत कार्बोरेटर के अंदर इंसर्ट कर दें यह ख्याल रखें कि पिस्टन में दो साइडों में दो तरह का ग्रिप होता है एक तरफ पूरी कटिंग वाली ग्रिप होती है दूसरी तरफ हाफ कटिंग वाली ग्रिप होती है आप कटिंग वाली ग्रिप कार्बोरेटर के प्लेन हिस्से की तरफ रखें। और हाफ कटिंग वाली ग्रिप दूसरी तरफ रखें।
उसके बाद एक्सीलेटर को घुमा घुमा करके चेक करें कि पिस्टन ठीक ढंग से बैठा है या नहीं अगर पूरी तरह मूव नहीं कर रहा है एक्सलेटर हाफ ही काम कर रहा है और हाफ नहीं काम कर रहा है तो आप दोबारा से पिस्टन को बाहर निकालें और फिर श्योरिटी ले लें की पिस्टन का ग्रुप किस तरफ बैठेगा फिर उसी तरफ बैठा करके और फिर एक्सीलेटर को घुमा करके चेक करें कि फुल काम कर रहा है या नहीं अगर ठीक ढंग से काम कर रहा है तो बस आपका एक्सलेटर ठीक-ठाक हो गया और अब फ्री हो चुका है अब आप इसे चलाएं अब किसी कि़स्म की परेशानी नहीं है । तो दोस्तों यह आर्टिकल कैसा लगा आपको अच्छा लगा तो लाइक करें शेयर करें फिर मिलते हैं अगले आर्टिकल में।

Please do not enter any spam link in the comment box. ConversionConversion EmoticonEmoticon